DISCLOSURE: This post may contain affiliate links through which I earn a small commission at no additional cost to you.
So, do you want to start a blog that is read by people all over the world and makes you money month after month?
I bet you can already envision yourself sitting on an exotic beach, sipping Pina Coladas, and making money simultaneously.
If you think this is just a dream, think again!
This can very well turn into a reality if you start a blog and run it the right way.
Besides making money, blogging can also help you generate leads, create brand awareness, boost SEO, develop and strengthen relationships with existing and new customers, increase ROI, and more.
And with as much as 77% of people on the internet reading blogs, it presents manifold opportunities for marketers.
In fact, as many as 59% of B2B marketers reported that they consider blogs as the most valuable channel.
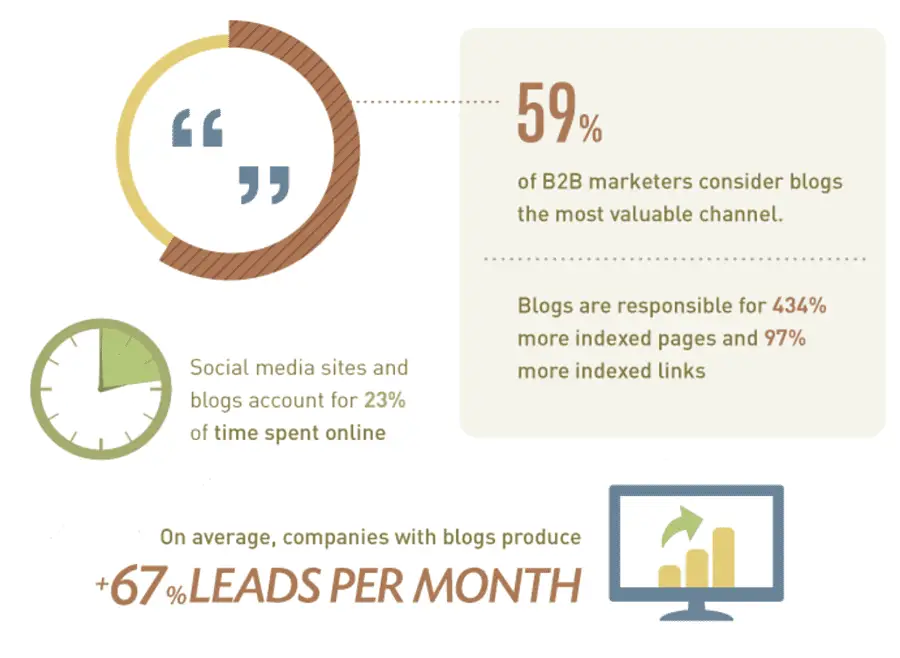
(Source)
If you are planning to start a blog, you came to the right place.
I created this comprehensive how-to guide so that you can set up your blog and get started on the right foot.
What if I’m not technical?
Don’t worry, even a beginner can implement all these steps – without any previous experience or technical know-how.
From selecting your blog’s name and niche to getting your blog online via web hosting and generating income from it, this comprehensive guide has got you covered.
So, without further ado, here are the seven easy steps on how to start a blog in 2021:
1. Pick Your Blog’s Niche And Name
The first step is to identify your niche and then pick a name accordingly.
What exactly is a blog niche?
Your blog niche is a specific topic that you choose to create content and posts about.
Once you build your audience around it, you can’t change your blog’s niche either. Thus, you should choose a topic you are really passionate about so that you don’t get tired of it.
Here are some of the most profitable blog niches you can capitalize on:
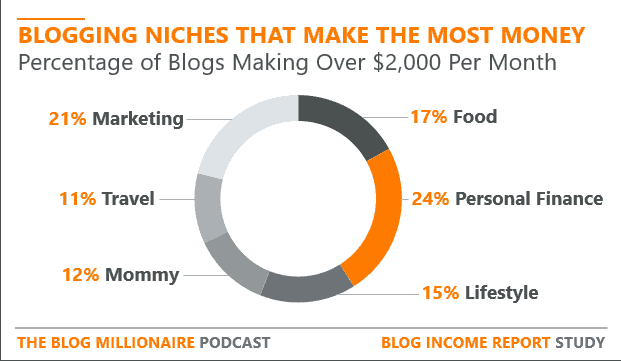
(Source)
However, choosing a popular niche of your interest isn’t enough. While deciding on your blog niche, you will have to understand who your target audience is and how profitable the niche is.
Your ideal niche should have a balance between these four elements:
- Passion
- Skill
- Experience
- Profit
Another essential thing is narrowing down your niche and targeting a particular audience.
Let’s say, for instance, you choose to write about cooking and documenting your recipes. Now, instead of creating content for anyone who is into cooking, you need to come up with a specific topic to target a particular audience.
It could be a topic about a specific type of cooking like pressure cooking, air frying, or grilling or a specific ingredient like tofu or organic produce. Choose one that is most profitable, and you are experienced in.
Once you have selected your topic, you need to discover if your blog niche has an audience.
Additionally, when choosing your niche, make sure to use tools such as Google Trends to identity two crucial data points:
- Whether or not online users are searching for your niche.
- Whether the interest of your target audience in your niche is increasing or decreasing.
You can also leverage Quantcast, a prominent audience-insight website.
Though not the deepest analysis, it’s a great place to begin. Google Trends Compare button will also give you an idea of how popular your niche is compared to other prospective niches.
It will also give you an indication of the stability of your niche.
For example, here are stats depicting interest over time in the niche: men’s fashion:

(Source)
Note that despite having slight ups and downs, people’s interest in this niche remains consistent.
Similarly, naming your blog is interesting as well.
However, since there are a myriad of choices, bloggers often get overwhelmed when they have to choose a name for their blog.
Starting from your own name to your business name or a descriptive combination of words, you can use anything.
Your blog’s name is the first thing that readers will see (example, yourblogname.com), so it is best if it represents your niche and future posts in the best light.
Or you could use your own name, business name, or a combination of words.
Here are a few things to consider while choosing your blog name:
- What are you going to blog about?
- Who is your target audience?
- What is the tone going to be like?
- Will you be building your brand around your blog name?
- Does your blog name sound OK when you put it in a domain URL format?
- Is your blog name open-ended enough to allow a change in the direction in case you decide to alter or vary your niche?
- Is it easy to say or spell?
You could also consider using blog name-generating tools like Wordoid and Panabee. Apart from those tools, you can use Thesaurus, Abbreviations, Alliteration, unrelated words to make it catchy.
2. Get Web Hosting & Register Your Domain Name
You need to get your blog online so that your audience can see you.
If not for automation and assistance by web-hosting providers, this would be a tough task.
Luckily, most web hosting companies get the job done for you.
However, you still have to choose a reliable web hosting platform.
An ideal web hosting platform should have the following traits:
- It should keep your data and files secure.
- Lower website downtime.
- Reliable track record.
- Budget-friendly.
- Built-in website builders.
- Quick WordPress setup.
- Easy to use cPanel.
- Unlimited Bandwidth and Disk Space.
- And more..
Based on this, many bloggers use a combination of WordPress powered by Bluehost.
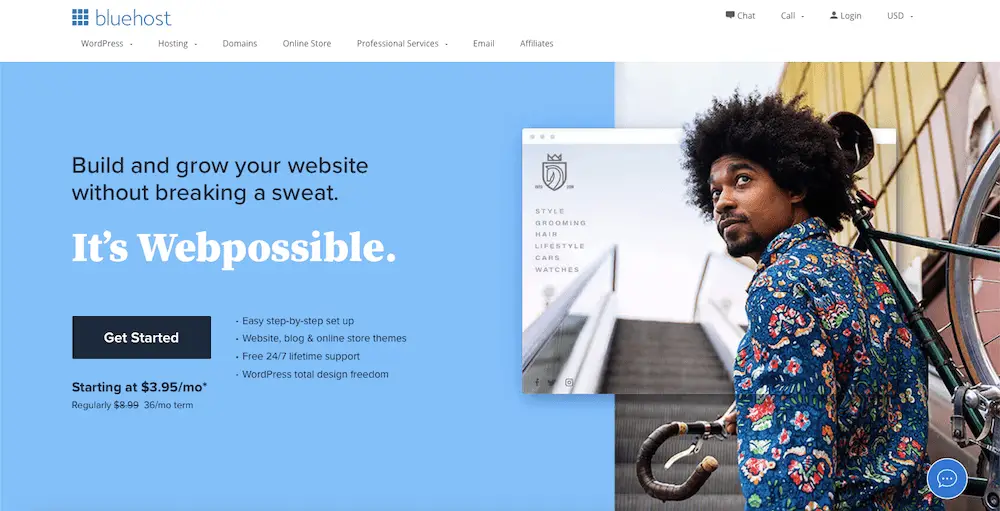
Bluehost has incredible features that can keep your site’s files safe and ensure that people can quickly access your blog after they click on a link or enter your URL.
All of the plans include a free domain name for 1st year, automatic WordPress installation, Microsoft 365 to enhance images and recognition with Microsoft email accounts, automatic WordPress updates, secure setup of login credentials, and get verified on Google My Business. Moreover, you get 24/7 WordPress hosting support.
To set up your Bluehost account:
Visit Bluehost’s home page and tap on the “Get Started” option.
After that, you’ll be prompted to choose a pricing plan based on your budget and requirements.
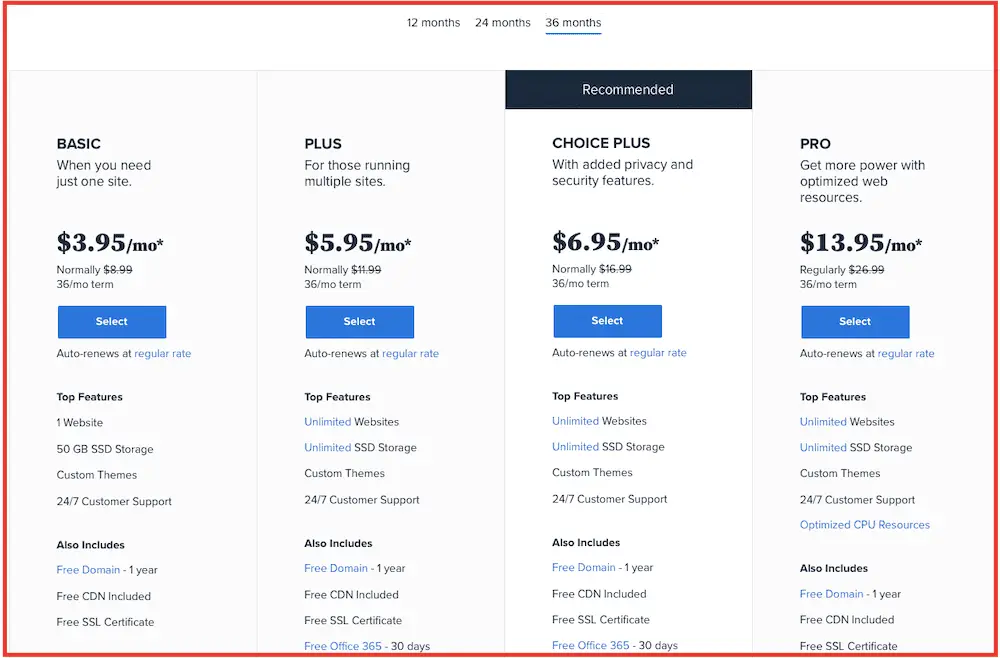
The “Choice Plus” plan is Bluehost’s most popular, not to say one of the most economical plans. Another reason to opt for this plan is its Domain Privacy feature that protects all your personal and confidential details like contact number, email address, etc.
However, you can start with another cheaper plan if you want and add the Domain Privacy option later on for $1 per month.
Click on the “Select” CTA button.
Next, you will have to select a domain name for your site.
If you already own a domain name, you can enter it here and undergo some steps to get your DNS pointed to Bluehost.
Or you can search available domain names and create one using Bluehost’s domain name finder tool.
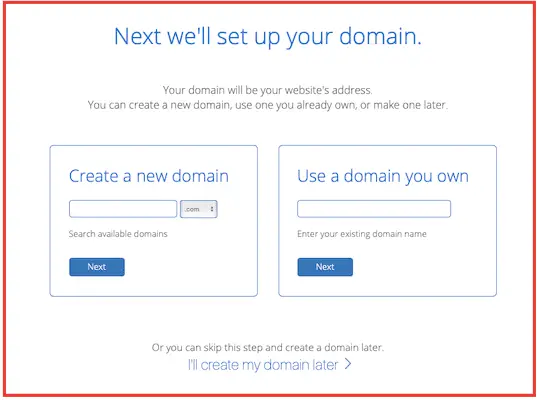
Choosing the right domain name is essential for your brand (for example, mine is lukeparker.com).
Consider these points before you go about choosing your domain name (i.e., if you’re not using your own name):
- It should create a lasting impression on your target audience.
- Make sure it defines your brand.
- Insert keywords to optimize for SEO.
- It shouldn’t be lengthy.
- Use .com when possible.
- Keep it easy to spell, memorize, and pronounce.
- Avoid using special characters or numbers.
- Use domain name generators like Namecheap to generate an optimized domain name.
If you’re still not sure that domain name to use, you can select the third option that allows you to “skip this step and create a domain later.”
In the next step, you will be asked to fill in your Personal Info, Package Information, and Payment Information.
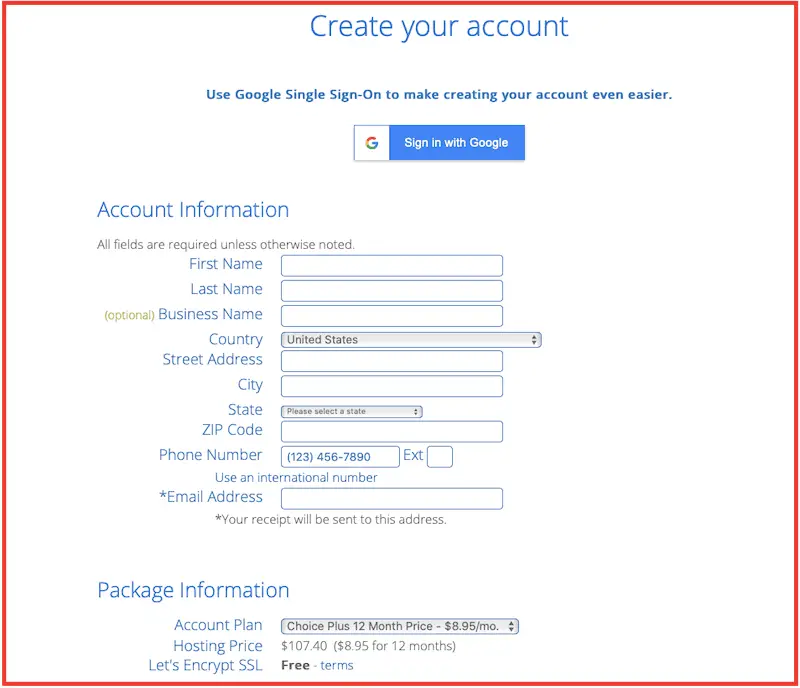
To save money, you might want to consider buying the longer-term package. With Bluehost, you can upgrade to VPS or dedicated server hosting accounts as well. The best part is that all of it can be easily done from your control panel.
You will also get an option to choose from some useful add-ons.
You might want to consider the paid “Domain Privacy” feature to keep your personal information private on WHOIS databases.
After you fill the form, click “Submit” to complete your purchase.
When asked to generate an account password, ensure that you create a strong one. You can make use of the Password Generator to create a secure and robust password.
3. Install WordPress (Your Blogging Platform)
You can’t start blogging with web hosting alone. Your web hosting is just a way to make your blog online and get it discovered by internet users.
Now you need a platform to start with your blogging endeavor.
And that’s where WordPress comes into play.
The chances are that you already know what WordPress is. But even if you don’t, here’s a quick definition to make you familiar.
WordPress is a famous blogging platform (or Content Management System or CMS) to start blogging with.
It’s an open-source platform that comes with plenty of built-in themes, a drag-and-drop website builder, thousands of plugins, and more to create a blog site and start blogging.
But before you install WordPress, note that it has two variations – WordPress.org and WordPress.com.
Largely, both have similar functionalities, albeit with some distinctive features.
Here’s a quick WordPress comparison infographic:
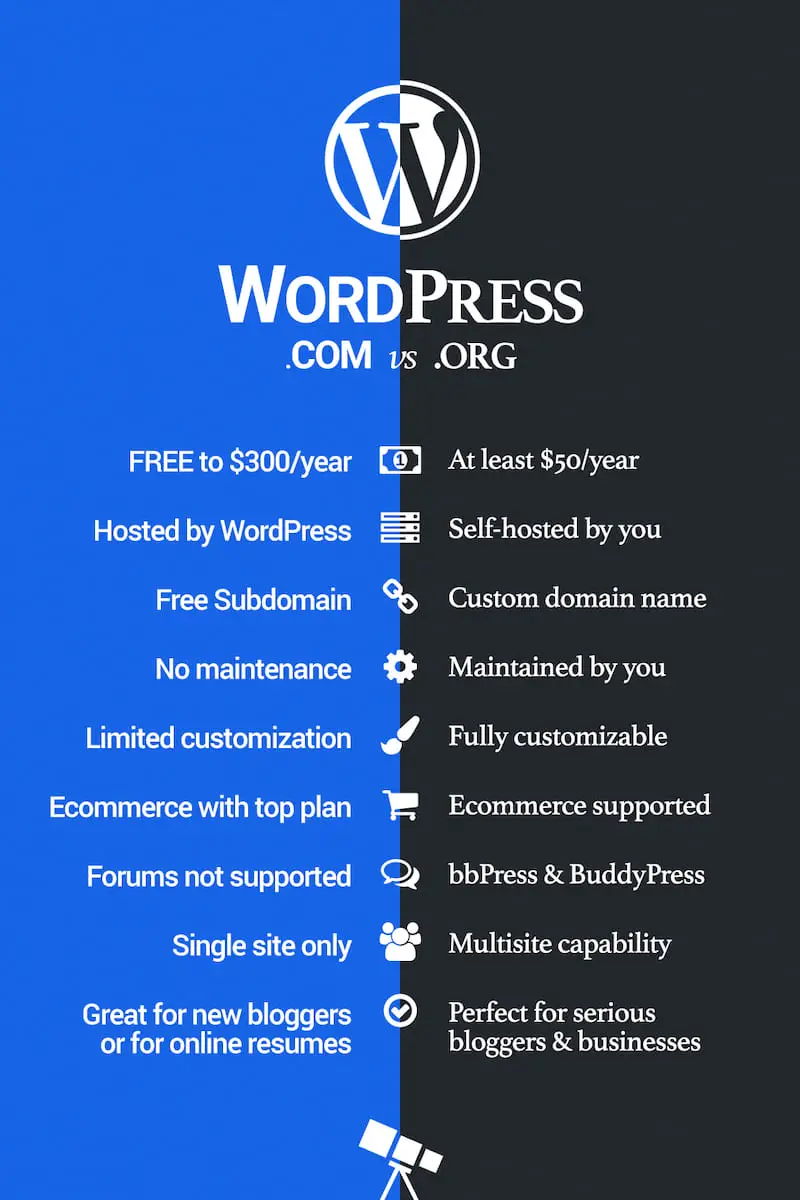
You can also look into several other blogging platforms like Blogger, Wix, Squarespace, Tumblr, Medium, etc. However, WordPress is still the best option due to its easy-to-use interface, optimized themes, plugins, and more.
Overall, WordPress is the largest CMS in the world with a 60.8% market share. The platform also powers 14.7% of the world’s best websites.
Installing WordPress can get easily complicated for those with no tech background.
However, Bluehost allows one-click installation of WordPress from its cPanel. It uses the new MOJO Marketplace for installing WordPress as well as other apps.
Follow these steps to install WordPress from your Bluehost cPanel:
Head to the cPanel and scroll down till you find the Website section.
Or you can do it using the Mojo Marketplace.
Go to the cPanel and scroll down till you reach the MOJO Marketplace section. Select the One-Click Installs button to go to the Scripts and Platforms page inside MOJO Marketplace.
In the blog section, click on the WordPress icon to open the installation window.
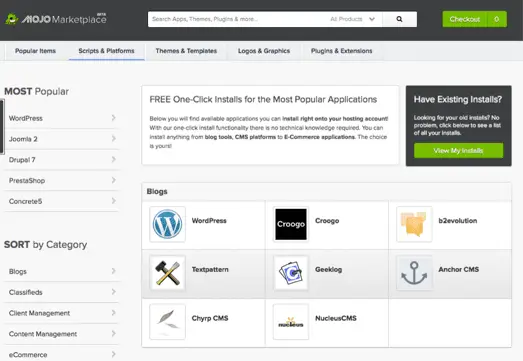
(Source)
Next, click on the “Start” button in green to begin the WordPress installation process.
Choose where to install WordPress – it could be a domain on your account, a subdomain, or even a domain folder.
You can then click on the “Check Domain” option.
Here’ you might receive a warning of files overwriting, but unless you have another website, check the box and continue.
If you have another website, double-check to avoid overwriting.
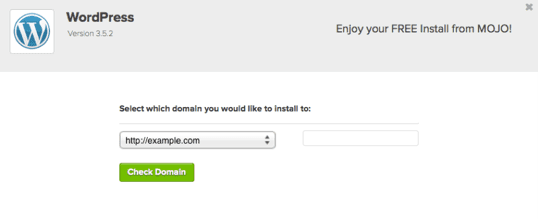
(Source)
Finally, click on the “Check Domain” button and proceed.
Now, you’ll be erected to “Show Advanced Options,” where you’ll be allowed to set up a username and password for your WordPress install. Make sure that you are using a different username than admin and generating a strong password.
Check the “Automatically create a new database for this installation” box. You can ignore this part if you have already set up your database.
Go through the terms and conditions and check the box.
Finally, click the “Install Now” option.
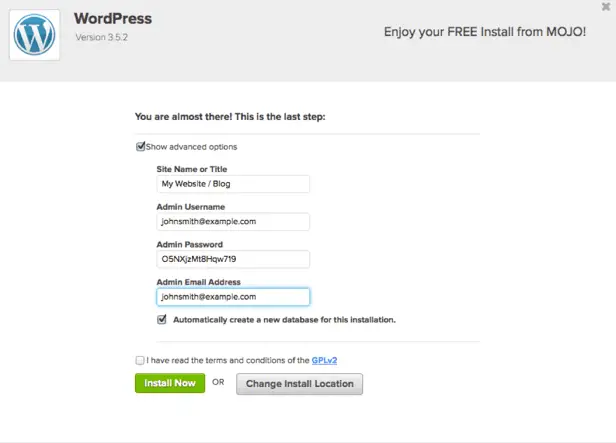
(Source)
This will lead you to the installation progress page. Once you install WordPress, this page will offer you your website URL, the admin login URL, username, and password.
Keep the copy of the information you receive via email in a safe place.
To log in to your WordPress site, go to the admin login URL, enter your username and password, and then select the “Log-In” button.
You can reach the WordPress dashboard directly from there.
Congratulations! You have successfully set up your very own WordPress website!
But there’s still a long way to go before you start popping the champagne corks.
Now’s the time to unleash your creative side since the next step will be to design your website using templates and plugins.
4. Choose a Theme to Design Your Blog
Now that you have installed WordPress, your task is to design a blog using any of the WordPress themes.
The best part? WordPress saves you plenty of time and money by offering customizable themes to avoid designing your site from scratch.
WordPress has over 3000 themes that are attractive, customizable, and mobile-friendly. Some of them are even free to use.
So, finding a theme to suit your needs won’t be a problem.
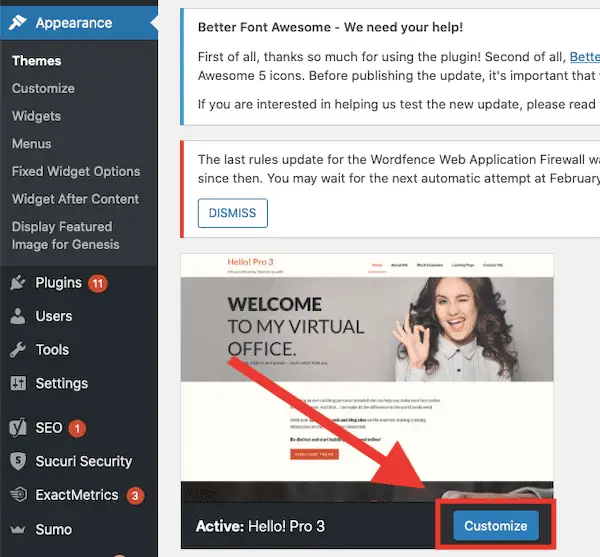
To access the design options, you need to go to WordPress admin and familiarize yourself with the Appearance section that you will find on the left side of the navigation.
To visit the Appearance menu:
- Go to the WordPress dashboard, and click on the “Themes” option within the Appearance menu.
- Next, click on “Add New” from the top of that page. You will come across different design options.
- Surf through “Featured,” “Popular,” or “Latest” categories or simply apply “Feature Filter” to discover specific themes with the kind of features you need. You can also sort the themes by color, features, layouts, and specific subjects.
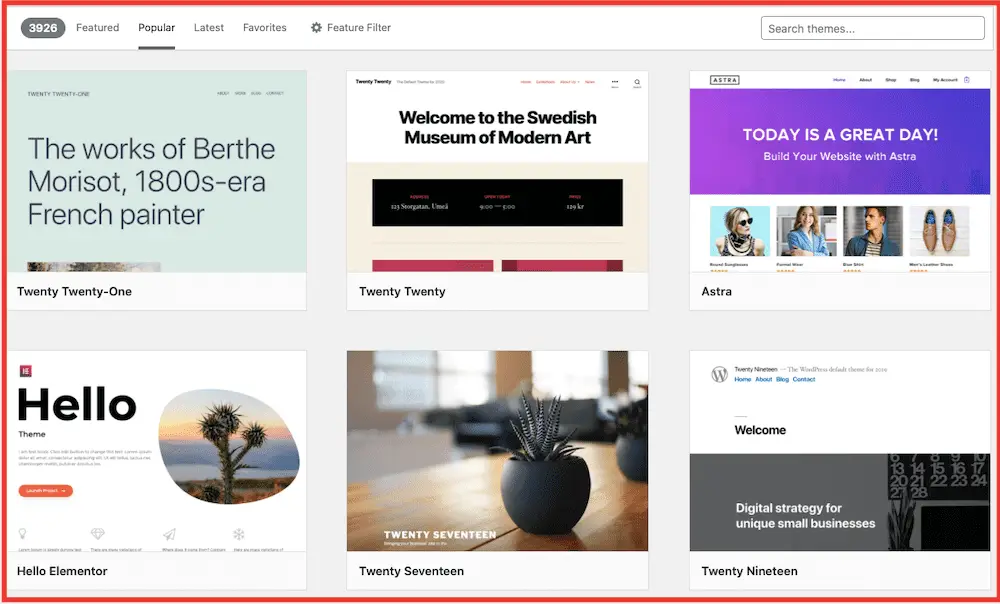
Click on the themes’ thumbnails to get a quick preview of what the final blog site will look like. Once you choose a theme, activate it by clicking on the “Install” option.
The installation process is automatic and once it’s complete, select the “Activate” button, and you’re all set.
Make sure that your theme is attractive, mobile-friendly, optimized for SEO, and isn’t cluttered.
Here are some essential tips to consider before you choose your WordPress theme:
- Check The Details – Check the details of the themes as each theme will have a page with further details. It will help you to arrive at a better decision.
- Recent Update – Ensure that the last updated date is recent. Outdated themes may not be compatible and may not even function with the latest WordPress version. Older themes also tend to break in the latest versions of the software.
- Number of Installs – Check out the number of active installs to know how many sites currently use the theme. If the number is high, it means the theme is of good quality. However, you also don’t want your site looking like a clone of thousands of other sites out there.
- Check Out Star Ratings – Since WordPress allows a rating system for their themes, check out the star ratings. Opt for the theme with higher ratings. Also, read the reviews that users leave about the theme.
- Developer’s Response Time – Try to gauge if the developer responds quickly to queries and offers solutions. The theme should also be actively maintained, up-to-date, and supported by a trustworthy developer.
- Mobile-Friendly – You want your site to be mobile responsive, as smartphones have taken over desktops. In the third quarter of 2020, 50.81% of global website traffic was credited to mobile (excluding tablets). Thus, a theme that looks great on smaller screens should be a focus. To see how your WordPress theme works on mobile devices, consider taking Google’s Mobile-Friendly Test.
If you don’t find any theme from the WordPress theme market, you can purchase premium themes from sites like:
- Themeforest
- Elegant Themes
- StudioPress
- Thrive Themes
So, your theme is activated, and you’re almost there.
Note that WordPress makes it easy for you to switch between and try out different designs without affecting your content. So, if you’re overwhelmed right now, you can start with a simple theme and switch to something else later on.
Now it’s time to move on to customizing and personalizing your theme.
5. Customize Your Theme and Optimize Your WordPress Blog
WordPress lets you personalize your theme in endless ways.
You can change the font, color palette, insert images, and a lot more.
The best part is that it comes with a drag-and-drop builder that makes it super easy to make these changes.
To get started, click on the “Customize” option on the rightmost side of your active theme.
You’ll get endless customization options in the menu bar on the leftmost side of your screen. However, these options may vary according to the theme you choose.
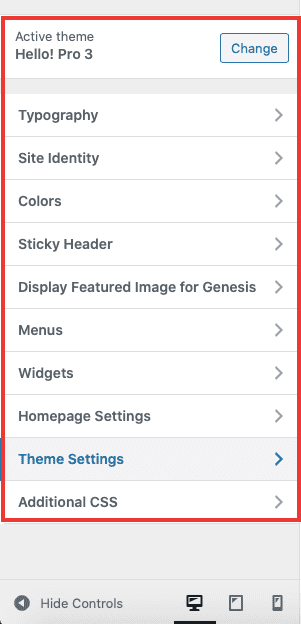
You can get started with the “Site Identity” edit option, where you insert your Site Title, Logo, Tagline, and more.
Click on the “Save and Publish” button when you’re done.
Besides, WordPress also integrates with countless plugins that can help you extend the functionality of your blog.
For instance, you can use third-party plugins to add share buttons, enhance SEO, forums, comments section, opt-in forms, and more.
The process of adding a new plugin is also simple.
Just head to the Plugins >> Add New option:
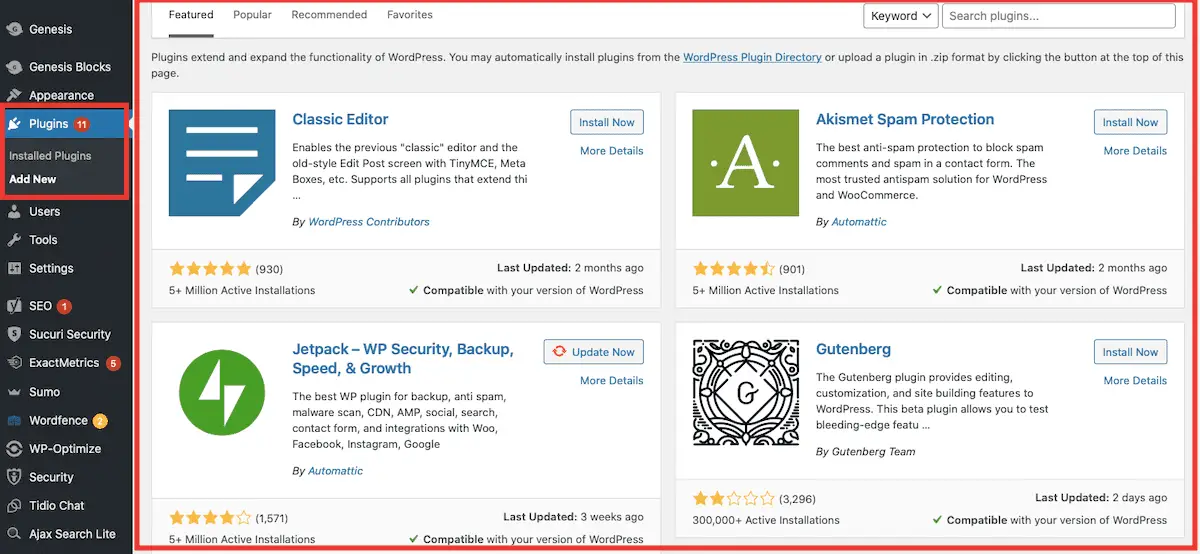
You can choose from multiple plugins to enhance your blog.
To get started, these are some must-have WordPress plugins for your blog:
- Yoast SEO – The Yoast SEO plugin helps you optimize your content and boost SEO to increase search engine rankings. It also helps you manage your sitemap, robots.txt, page title, meta descriptions, and more.
- WP Forms – To simply drag-and-drop contact forms onto any page of your blog.
- Elementor Pro – It’s a drag-and-drop landing page builder that can help you create attractive pages like Homepage, About page, and more.
- Google Analytics – It’s essential to identify how your blog posts are performing and keep track of your revenue and audience.
- UpdraftPlus – This is a backup plugin that will take regular backups of your data and critical files.
- WP Rocket – It minifies HTML, CSS, and JavaScript and reduces database bloat to boost your page load speed. This plugin also caches your pages.
Don’t forget to optimize your website for search engines and link your site to social media accounts to encourage content sharing.
Create Essential Pages For Your Blog (Homepage, Contact, About)
Your blog site needs to have other essential pages as well besides your homepage.
Three must-have pages include:
- Homepage
- About page
- Contact page
Here are some standard tips to consider while creating these pages:
- Insert relevant keywords in your content’s body and URL
- Create keyword-rich and eye-catching titles/headings
- Add images/graphics to capture readers’ attention
- CTA buttons to compel readers to take any action or head to another page, post, landing page, etc.
- Internal links pointing to other pages and posts
6. Create Engaging Content and Publish Your First Blog Post
Once you are done with designing your site, you are now ready to publish your first post.
It goes without saying that you need a blog post with great content. Your blog posts should be well-researched, detailed, and should have all the info your readers are seeking.
Moreover, research suggests that long-form content works better than shorter blog posts.
Most bloggers see good results from blog posts with 3000 words or more.
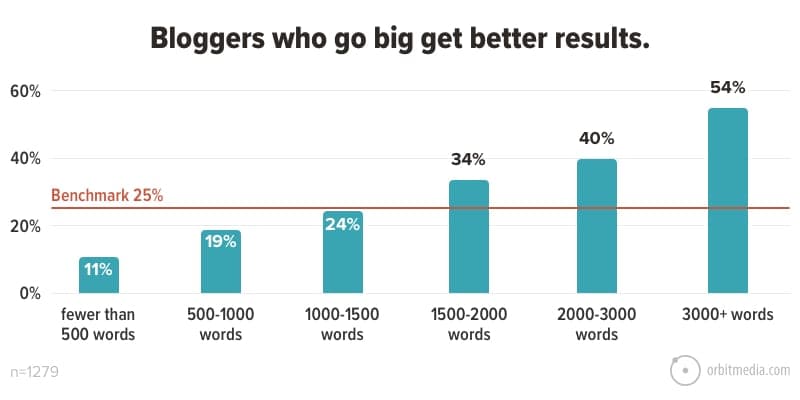
(Source)
However, the content has to be easy to read and conversational in nature.
After all, 43% of people say that they merely skim blog posts. So, make the post readable by using lists, bullet points, subheads, and short paragraphs.
Here are some things to consider while creating your blog post:
- Make it easy to read and conversational
- Use easily readable fonts
- Break down content using bullet points, sub-headings, and short paras
- Make it visually appealing by adding relevant images, infographics, and videos
- Make sure your post answers all of your readers’ questions
Further, below are some quick blogging stats for you to refer to and steal ideas from:
1. Stats that show the importance of adding video and images in blogging.
- When bloggers include images in their articles, they get 94% more views as compared to those with no images.
- Using photos of real people instead of stock photos can increase conversion by 35%.
- 43% of consumers say they wish to see video content in blogs.
- Video content is 50 X more likely to drive organic search traffic as compared to plain text.
2. Stats about blog headlines.
- Blog titles with 6-13 words get the maximum and most steady amount of traffic.
- Creating headlines of about 6-8 words can boost your CTR by 21%.
- 36% of readers favor list-based headlines.
3. Stats to consider while writing and publishing blog posts.
- 66% of bloggers today publish posts a few times monthly as opposed to a few times weekly, as in the past.
- 60% of bloggers write 1-5 guest posts monthly.
- 62.96% of readers say that seeing multiple authors in blogs makes them think the blog is more credible.
4. Stats that show the importance of CTA buttons.
- As per SAP, orange CTAs increased their conversion rate by 32.5%.
- As per Performable, red CTAs increased their conversion rate by 21%.
- According to HubSpot, anchor text CTAs boosted conversion rates by 121%.
- Personalized CTAs convert 42% more as opposed to untargeted CTAs.
5. Stats that show the importance of SEO-friendly content.
- 93% of online experiences start with a search engine.
- 72% of online marketers say content marketing is their most effective SEO strategy.
- 70-80% of people overlook paid search results and only click on organic search results.
Publish Your First Blog
It is easy to create and publish blogs on WordPress.
To create your first blog post, head to the WordPress dashboard and click on the “Posts” option —–> and then on the “Add New” section.
You can write your first blog post in the editor area. And at the top, you can enter your post’s title.
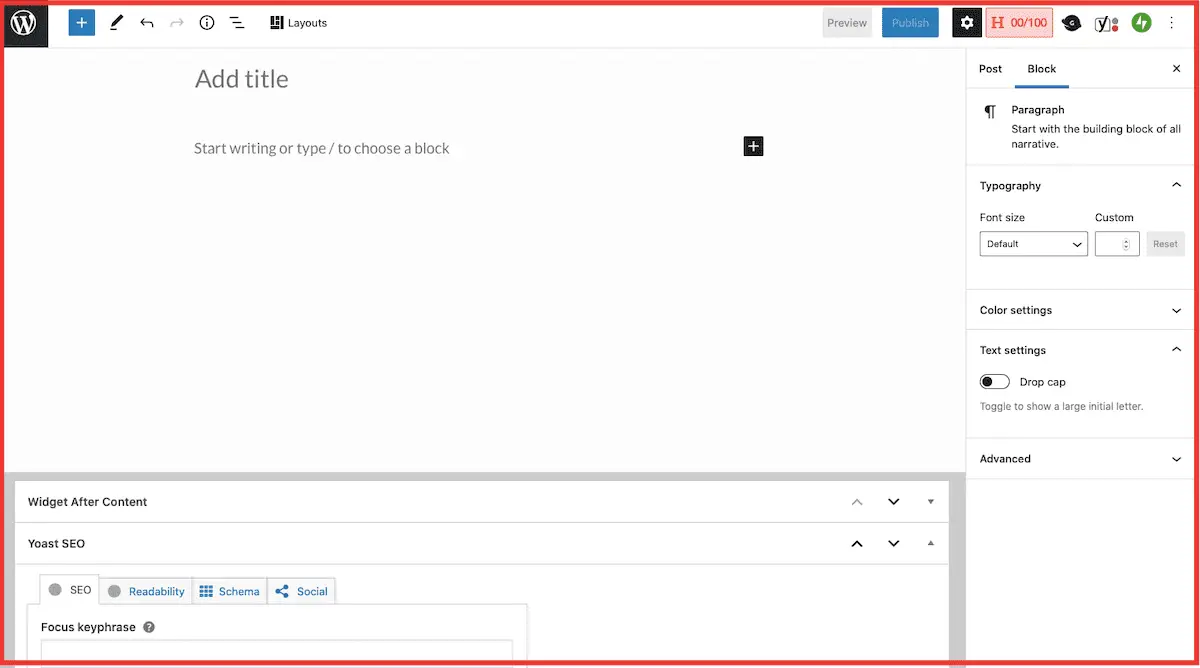
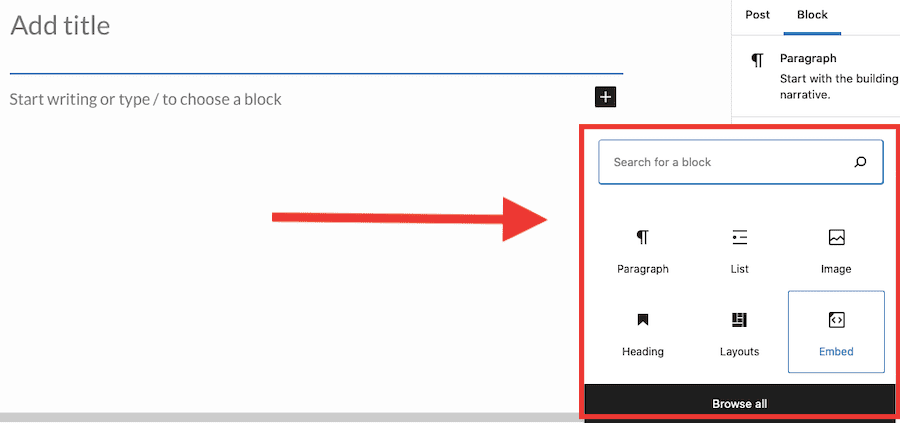
You can then use WordPress’s block-based editor to create attractive content layouts for your post.
To add images, simply add the image block and then upload or select the preferred image.
If you prefer your text and image next to each other, there is the Media & Text block feature.
To display pictures in rows and columns with a grid layout, add the Gallery block, and then upload or select the images from your media library.
To convert your video URL into a video embed block, simply copy and paste the video URL to the paragraph block. You can also embed a YouTube video in WordPress.
While you can directly upload videos to your blog using the video block, it slows down your blog and can crash your WordPress hosting server. Thus, it is safer to upload your videos on a service like YouTube, only then embed it in your posts.
When you’re done writing, click on the Publish button from the top right part of your page. It will make your post publicly available.
Use sections like “Categories” and “Tags” to organize your blog posts and set them into different categories.
7. Promote and Monetize Your Blog
Crafting amazing blog posts isn’t nearly enough.
One of the most important parts of running a blog is bringing in readers and gaining substantial traction.
Let’s look into some of the best mediums to promote your blog posts.
Ways to Promote Your Blog
1. Social Media
Social media is where most of your readers and prospects spend their time. It is used by 3.6 billion people worldwide and the number is estimated to reach 4.41 billion in 2025.
As of January 2021, the most popular social media site is Facebook.
However, you have to make sure you are leveraging all the popular social platforms according to your niche. For example, if you’re blogging about fashion and lifestyle, you need to make social platforms like Instagram and Pinterest your priority.
Prior to posting, however, invest time in developing a strong social media presence. Tempting as it may seem, don’t post swipe-up links to your content every day.
You can also utilize social media automation tools like Buffer and Hootsuite to manage all your social accounts and schedule your posts.
2. Link Building
Building links to your blog is a great long-term SEO strategy that will help you rank higher on search engines.
One of the effective ways to build backlinks to your blog is guest posting. You can reach out to reputable blogs in your niche and then start pitching ideas.
Put special emphasis on target publications. You can use tools like BuzzSumo to uncover reputed online publications that are open to receiving guest posts in your niche.
Finally, extract their email address or a way to reach out to them and pitch your guest post ideas. Make sure you offer some value to them in the form of high-quality guest blog posts.
You can also do competitor research to view which websites your direct competitors are linking to.
3. Network With Other Similar Bloggers
Networking with other bloggers and influencers in your niche may not affect your SEO rankings, but it can get you the attention of numerous people in your industry. And once you catch their attention, they might share your content with their followers as well.
Here are the easiest ways to build a relationship with other bloggers in your industry:
- Leave relevant comments on their blog posts or social media posts.
- Reach out to them via email and tell them why you like their posts.
- Share their content on your own social media channels.
- Try to join Facebook and Reddit communities with other influencers and bloggers.
4. Create UTM links
UTM codes or links are certain snippets added at the end of your blog post URL. It makes monitoring and tracking your marketing campaigns on Google Analytics easier. Plus, it offers more detailed results than Google Analytics, making it easier to track the exact content that brings the traffic.
Now that all is done, it’s time to make money.
Whew, finally!
Luckily, you can use numerous ways simultaneously to make money from your blog.
Here are some of the easiest ways to monetize your blog.
Ways to Monetize Your Blog
1. Ad Networks
Ad networks are simple and popularly used by bloggers for monetizing their blogs. When applied, the ads get displayed automatically based on the article’s context and user interest. These ads are great for earning recurring income. The two popular Ad networks include Google AdSense and Media.net.
2. Affiliate Marketing
Affiliate marketing is a skill-based approach wherein you refer affiliates to any online product you have chosen. You get a commission when that person purchases the product you recommended. Popular Affiliate marketing marketplaces include the Amazon Affiliate program, ShareASale, and PartnerStack.
3. Launch an Online Course
If you can convert your content into a video format, add the checklist, downloadable templates, and create a 1-2 hour video course, you can easily launch an online course.
However, make sure you are offering a unique course. Platforms such as LearnDash (WordPress) and Teachable can help you easily launch your course and make money.
4. Sell Your Service
Many bloggers use their blog sites to generate target audiences to pitch their services to.
Landing freelancing writing gigs is one of the most popular services people sell this way. In that case, your own blog posts work as your portfolio and showcase your writing chops.
Besides, photography, marketing, social media management, and more are other services you can sell.
To land a well-paid job using your blog site, make sure to create a convincing “Hire me” page and a Contact page with updated contact information.
All this considered, driving revenue should not be the only goal you have. Make sure to focus on
building a meaningful community and providing value to your audience, money will eventually follow suit.
Wrapping-Up
There you have it – 7 steps to help you start a blog in 2021.
Whether you want to market your products and services to the world or want to make money online, blogging can help you achieve both. You can refer to this detailed guide anytime you get stuck while setting up your blog.
Many bloggers are already making money out of their blogs. Why should you delay the benefit? Start by choosing a good platform and host, designing your blog, and publishing your first blog post.